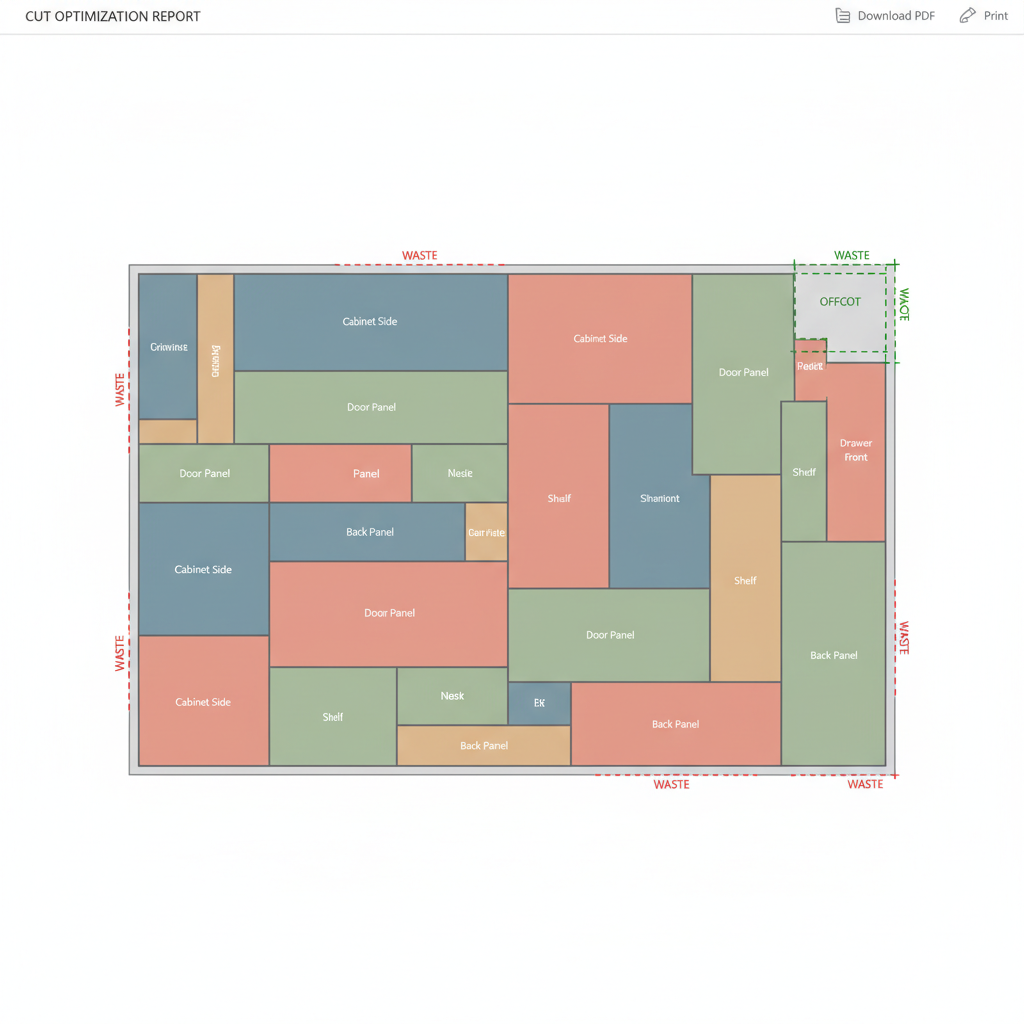
Acrylic Cutting Optimization for Signage: Layout
At the heart of every efficient signage operation is a reliable cut plan. When your input material is acrylic in 2400×1200mm, 3000×2000mm, every decision you make at the planning stage has a direct dollar impact.
Key Benefits
The Hidden Costs of Acrylic Waste in Signage
In signage, throwing away acrylic offcuts isn't just throwing away material—it's throwing away profit. When material prices fluctuate, maintaining tight control over your inventory and scrap rates is the only reliable way to protect your margins.
Many workshops accept a 20% waste rate as "the cost of doing business." However, modern digital tools have proven this number can be halved. If your shop processes significant volumes of acrylic, reducing waste by just 10% can equal thousands of dollars saved annually.
Manual Layouts vs. Algorithmic Optimizeion
Historically, signage professionals have relied on sketchpads or whiteboards to plan their cuts. While better than guessing at the saw, this has severe limitations. Humans naturally try to align edges and create tidy rows, which rarely results in the tightest mathematical fit.
Switching to an algorithmic planner means feeding the computer your dimensions, and it evaluates thousands of permutations in seconds—effortlessly handling the complex nesting required to squeeze every last millimeter out of your acrylic.
Managing Your Acrylic Offcuts
One of the biggest leaks in a signage workshop's budget is mismanagement of offcuts. A large scrap of acrylic leaned against the wall is effectively frozen cash.
The secret to maximizing material yield is an inventory system that forces you to use offcuts first. Before suggesting a new sheet or length, the software should attempt to fulfill the cut list using your existing reusable scrap.
Understanding Acrylic Stock Sizes and How They Affect Optimizeion
Acrylic is typically available in 2400×1200mm, 3000×2000mm. The choice of stock size has a significant impact on how efficiently your parts can be nested. A stock size that aligns well with your most common part dimensions will yield far less waste.
Running an optimization analysis with multiple stock sizes side by side is the only reliable way to determine which is most efficient for your specific mix of signage jobs.
The Signage Production Workflow and Where Optimizeion Fits
The standard signage workflow is: measure, plan, cut, and install. Cut optimization has its highest impact at the planning stage—before any material is touched—but it also provides ongoing value by tracking offcuts that accumulate during production.
The biggest pain point in this workflow is balancing material costs against project requirements. Integrating a systematic cut plan into the early stages of the process directly resolves this bottleneck.
Why material yield percentage Is the Metric That Matters for Signage
Different businesses measure efficiency in different ways, but for signage dealing with acrylic, material yield percentage is the most actionable number. It tells you directly how much material you are getting value from versus how much you are paying for and discarding.
Tracking this metric consistently over time makes it easy to see whether process changes are helping or hurting. If your yield drops after hiring new staff or switching suppliers, the data will surface it immediately.
Buying Acrylic Smarter with Better Cut Planning
One of the most underrated benefits of cut optimization software for signage is improved purchasing decisions. When you know exactly how many sheets, rolls, or lengths a job requires before you place the order, you stop over-buying as a buffer against uncertainty.
Over-ordering is one of the most common sources of acrylic waste in signage. It creates physical clutter, ties up working capital, and often results in material being discarded when it falls below the minimum usable size.
Common Applications
- Running end-of-day summaries to determine how much acrylic was consumed and what offcuts remain.
- Managing a mixed job queue where the same acrylic stock is shared across multiple customer orders.
- Handling custom acrylic orders where every piece has a unique dimension.
- Bulk manufacturing runs for signage requiring hundreds of identical parts.
Pro Tips for Acrylic
- Always account for your blade kerf. Forgetting typically 2–3mm for a table saw or laser cutter across ten cuts can ruin the final piece.
- Use CutWize's sheet overlays to verify T-1-11 groove alignment or plywood grain direction before committing to a cut.
- Keep a log of the types of acrylic cuts you most commonly make in signage. Building templates saves planning time on repeat jobs.
- Standardize your design dimensions to fit evenly into raw acrylic stock sizes (2400×1200mm, 3000×2000mm) whenever possible.
- Group your cuts. Running multiple jobs simultaneously allows algorithms to nest parts far more densely.
- When cutting acrylic, cut the largest parts first. Smaller parts are easier to fill in the remaining gaps afterward.
Quick Start Guide: Acrylic
Audit Your Current Offcut Stock
Before starting any new signage job involving acrylic, take stock of your existing offcuts. Enter them into your inventory so the optimizer can use them before you open new material.
Build Your Cut List
Collect all part dimensions from your signage drawings or specifications. Batch parts from multiple jobs if possible—more parts means better nesting.
Configure Material Settings
Set your acrylic stock size (2400×1200mm sheets), blade kerf (typically 2–3mm for a table saw or laser cutter), and any constraints such as brittle edges that require careful handling after cutting.
Generate and Review
Run the optimizer and review the pattern. Check yield percentage and identify any awkward offcuts that could be avoided with minor part size adjustments.
Place Your Timber or Sheet Order
Use the exact material quantities from the optimized plan to place your supplier order. No more adding a buffer—let the data decide.
Frequently Asked Questions
What is a good material yield percentage target for signage?
How much acrylic waste is typical for signage?
Is it worth tracking small acrylic offcuts for signage?
Is optimization software expensive for signage?
Can I import my cut list from a spreadsheet?
What's the ROI of using cut optimization software in signage?
How does CutWize handle signage workflows specifically?
Start Saving Material Today
Ready to stop wasting acrylic and streamline your signage workflow? Generate your first optimized layout today—free to start, no credit card required.
Try CutWize Free